Creating Advanced Rooms: различия между версиями
Перейти к навигации
Перейти к поиску
Jehvehard (обсуждение | вклад) м (Добавил примичание от администрации.) |
|||
| Строка 9: | Строка 9: | ||
|description = This is a guide on how to construct a more efficient room/workplace for whatever occupation you find yourself in.}} | |description = This is a guide on how to construct a more efficient room/workplace for whatever occupation you find yourself in.}} | ||
| − | ==Surgery / Operating Room== | + | ==Surgery / Operating Room<!-- Внимание! Внимание! Все нижеперечисленные улучшения должны выполняться инженерами. Противном случае это будет ПГ и несоответствие должности! -->== |
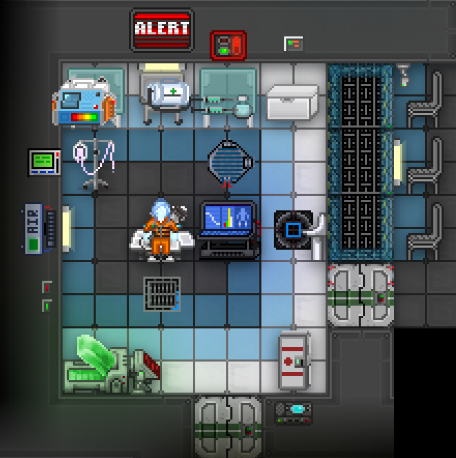
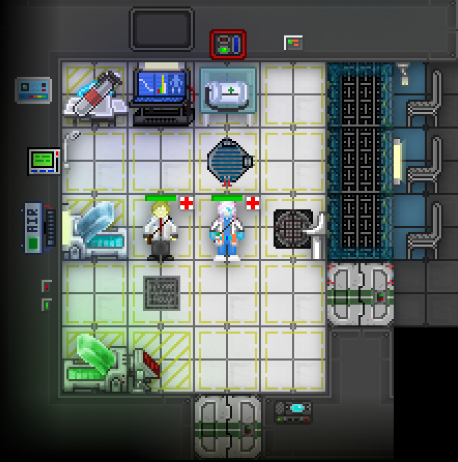
[[File:Normal Surgery Room.png]] Into [[File:Advanced Surgery Room.png]] | [[File:Normal Surgery Room.png]] Into [[File:Advanced Surgery Room.png]] | ||
Версия 08:43, 26 декабря 2020
| Advanced Rooms | |
|---|---|

|
Можно найти в: Your Current Occupation Используется для: Improving your personal workplace. Стратегия: Doing your job more efficiently. |
| Описание | |
|
This is a guide on how to construct a more efficient room/workplace for whatever occupation you find yourself in. | |
Surgery / Operating Room
These are the steps you'll need to change this Normal Basic Surgery Room into the Advanced Customized Surgery Room.
- Open the locker on the top right, take out all the tools you want on you for the shift. These are the things you'll NEED to take out at the very least:
- Defibrillator, Medical Duffel Bag.
- The medical jacket can hold two extra slots to transport items.
- Set the defibrillator aside, place all the tools on the table inside of the Medical Duffel Bag except for the saline-glucose bag.
- You'll want to put the saline-glucose bag in the freezer in the room below (south).
- Defibrillator, Medical Duffel Bag.
- Open the locker on the bottom right, take out one mask and one anas tank. The tank SHOULD last for the entire shift if you know what you're doing.
- You'll want to place that locker into the room below (south) along with the other locker on the top right.
- Take a trip to RnD, you'll want to order the parts for Sleeper-Construction at RnD. They are:
- 1 Sleeper Circuit, 1 Matter Bin, 1 Manipulator, 2 Console Screens, and a Defib Wall Mount.
- The level of Matter Bin and Manipulator will decide how upgraded the machine is that it is being put in.
- Later on, you'll ask RnD for Nanopaste and an IMS.
- 1 Sleeper Circuit, 1 Matter Bin, 1 Manipulator, 2 Console Screens, and a Defib Wall Mount.
- Take a trip to Cargo, you'll want to order the tools to construct and deconstruct items in the Surgery Room. The parts you'll order from Cargo are:
- Screwdriver, Wrench, Wirecutters, Crowbar, 10 Cable Coil, and 5 Metal.
- If they don't have metal, simply use the wrench to go around and deconstruct things until you have metal.
- Optionally, you can ask for Floor Painter.
- Optionally, you can order a Hygiene Crate to get a shower OR you can steal one from virology or the dorm showers.
- Screwdriver, Wrench, Wirecutters, Crowbar, 10 Cable Coil, and 5 Metal.
Now you have all the tools to edit the Surgery Room!
- Arrive back at the Surgery Room, you deconstruct the tables, move around the surgery table, the surgery console with the tools. Move around everything with the items you have until it looks like the picture above.
- Place the Defibrillator from earlier into the wall mount after setting it on a wall.
- Place the shower over the surgery bed or next to it.
- Move the sleeper and surgery console to where you want.
- Optionally, paint the floors with the floor painter to your liking.
- Ask RnD for NanoPaste and IMS now after you've given them time to set up and level up research.
- Put all the loose parts, tools, cloth items you don't want into the locker in the other room.

